![]() How to Build Your Smart Socket
How to Build Your Smart Socket

-
 1-Phase Smart-Socket:
-
 2-Phase Smart-Socket:
-
 3-Phase Smart-Socket:
4-in-1 screwdriver |
Cable clamps |
Crowd Energy certified Smart-Meter: |
4-in-1 screwdriver |
Cable clamps |
Crowd Energy certified Smart-Meter: |
4-in-1 screwdriver |
Cable clamps |
Crowd Energy certified Smart-Meter: |
 Choose and Mark the Outlet Location
- It is very important to choose the right location for your new outlet. Most critically, it must be easily accessible for Crowd Consumers on or outside your property.
- Of course, you will also want to optimize the distance between the outlet and electrical panel to as minimal as possible. A shorter connection cable between the power source and outlet will help lower construction costs, losses in efficiency, and potential safety hazards.
Note: The power cable running between the outlet and EV cannot cross a sidewalk or disturb any public area otherwise.
 Turn Off the Power
- Turn off the circuit breaker of the power source which will control the outlet.
- Use a non-contact voltage tester to be sure that the power is off.
- Unscrew and pull the receptacle out of the electrical box.
- Hold the voltage tester over the terminals to double-check that the power is off.
 Drill Through the Exterior Wall
- Use a wire sensor to determine that there are no hidden wires that you may accidentally cut before drilling into your exterior wall.
- Follow the instructions to mount the outdoor outlet at your selected location.
- Place the new outlet on the wall to mark the points where the holes will be drilled.
- First, drill a small hole through the wall or the building siding where the markers have been made.
- Then, drill a bigger hole over the smaller hole to make room for the cable.
- Most developed countries define a required minimum height above the ground to place a new power socket. Make sure you comply with these standards as applicable.
Note: If drilling through stucco, you'll probably wreck the bit, but you'll get through the siding. For brick, use a masonry drill bit with a hammer drill. Then drill a series of small-diameter holes around the marker hole and knock out the center with a hammer and chisel.

Run Cable From Power Sources
into New Outlet
- Find the distribution box in your house with free slot for new power-meter and circuit breaker device. The typical requirement for our certified power-meter is 35mm DIN rail. The distribution box needs to be in range of your WIFI router so the power-meter device can access the internet.
- Choose the right cable certified for maximum current and distance length between distribution box and outdoor outlet.
- Make sure you have a properly measured the length of the cable before buying it. Don’t join 2 short cables unless there is a technical reason which comply with standards.
- Run the cable from distribution box to new outlet location. You may need to cable out through the walls or ground to overcome the distance. Make sure cable is well covered and installed. Never make cable disclosed from outside instead run wire inside metal or plastic conduit.
Note: If you have aluminum wiring, call in a licensed electrician who is certified to work with it. This wiring is dull gray, not the dull orange that is characteristic of copper wire.

Mount and Wire the New Outlet
- If the cable is connected from outside, attach a clamp to the box, feed the cable through it into the box, and then caulk around the clamp.
- The caulk makes the hole watertight. We placed our box horizontally on the lap siding so it could lie flat.
- Mount the exterior outlet box to the wall.
- If you have lap siding (wood, hardboard, fiber cement) or plywood sheathing, mount the junction box to the wall, using exterior-grade fasteners. Simply drive galvanized deck screws through the mounting lugs. For brick or stucco siding, mount the box with masonry anchors. For vinyl siding over composition board, use hollow wall anchors.
- Fasten plugs into the openings on both ends of the box.
- Next, strip the insulation off the wire ends.
- Attach the ground wire to the green screw in the box and to the green screw on the outlet. Make sure to identify the “line” (L) and “neutral” (N) terminals. They may be labeled as “hot” (L) and “white” (N) terminals depending on the country’s region. Then, attach the brown or black wire to the brass screw or adjacent push-in hole (labeled “line” or ”hot”) and the blue or white wire to the silver screw or push-in hole (labeled “neural” or “white”).
- Finally, clip the ears off the outlet, fold the wires into the box, and set the outlet in place.
Note: Each outlet may be slightly different in details so the best way to complete this step is to follow the instruction manual you receive for the outlet.
 Plug and Wire the New Circuit-Breaker and Smart Meter Device
- Ensure once again that power has remained off since step 2.
- In the power distribution box located in step 3, install the circuit-breaker (recommended capacity of 16A or higher) and the Crowd Energy certified smart-meter device, by plugging both into the DIN rail.
- Connect the wires so that the power coming from your house is going through the circuit-breaker first and then to the input (IN) of the smart meter. The output (OUT) of the smart meter should be connected with a cable ( installed in step 3). To wire a new outdoor outlet:
- Connect the phase “line” (or “hot”) wire ]to one of the screws in the circuit-breaker (typically the top or left one).
- Connect the second screw of the circuit-breaker to the input (IN) screw labeled as “L” on the smart meter. Here, use the wire of the same color as in Phase 1.
- Next, connect the input (IN) screw labeled as “N” to the smart meter with the “neutral” (or “white”) wire in the distribution box.
- Then, connect the brown/black color wire to the outdoor outlet with the output (OUT) screw labeled as “L” on the smart meter. Similarly, connect the Neutral wire of the same cable (wire in blue/white color) with the output (OUT) screw labeled as “N” on the smart meter.
 Test the New Outlet
- Switch the newly installed circuit-breaker ON in the distribution box.
- Turn the power back ON in the same way as it was turned off in step 2.
- Plug in a mobile phone charger and connect your device to test the new outlet.
- If the phone begins to charge, then you are ready to proceed with the next steps to register your smart-meter device on the Crowd Energy Network.
Register A New Smart-Meter device on the Crowd Energy Network
- First, verify that your smart-meter device is powered up, by checking the LED indicator on the front side. If it is on, the light will be illuminated.
- Next, make sure the smart-meter device is located within the range of your WIFI router, so it can reliably access the internet.
- Install the
 Crowd Energy mobile-app from
  Apple Store or
  Google Play store.
 - If the LED light does not blink, press and hold the pairing button located on the front of the smart-meter device for 5-second until the LED indicator blinks fast (2 times per second).
- Launch the Crowd Energy mobile-app.
- Follow the Sign-Up to register for a new account or Sign-In with your existing account.
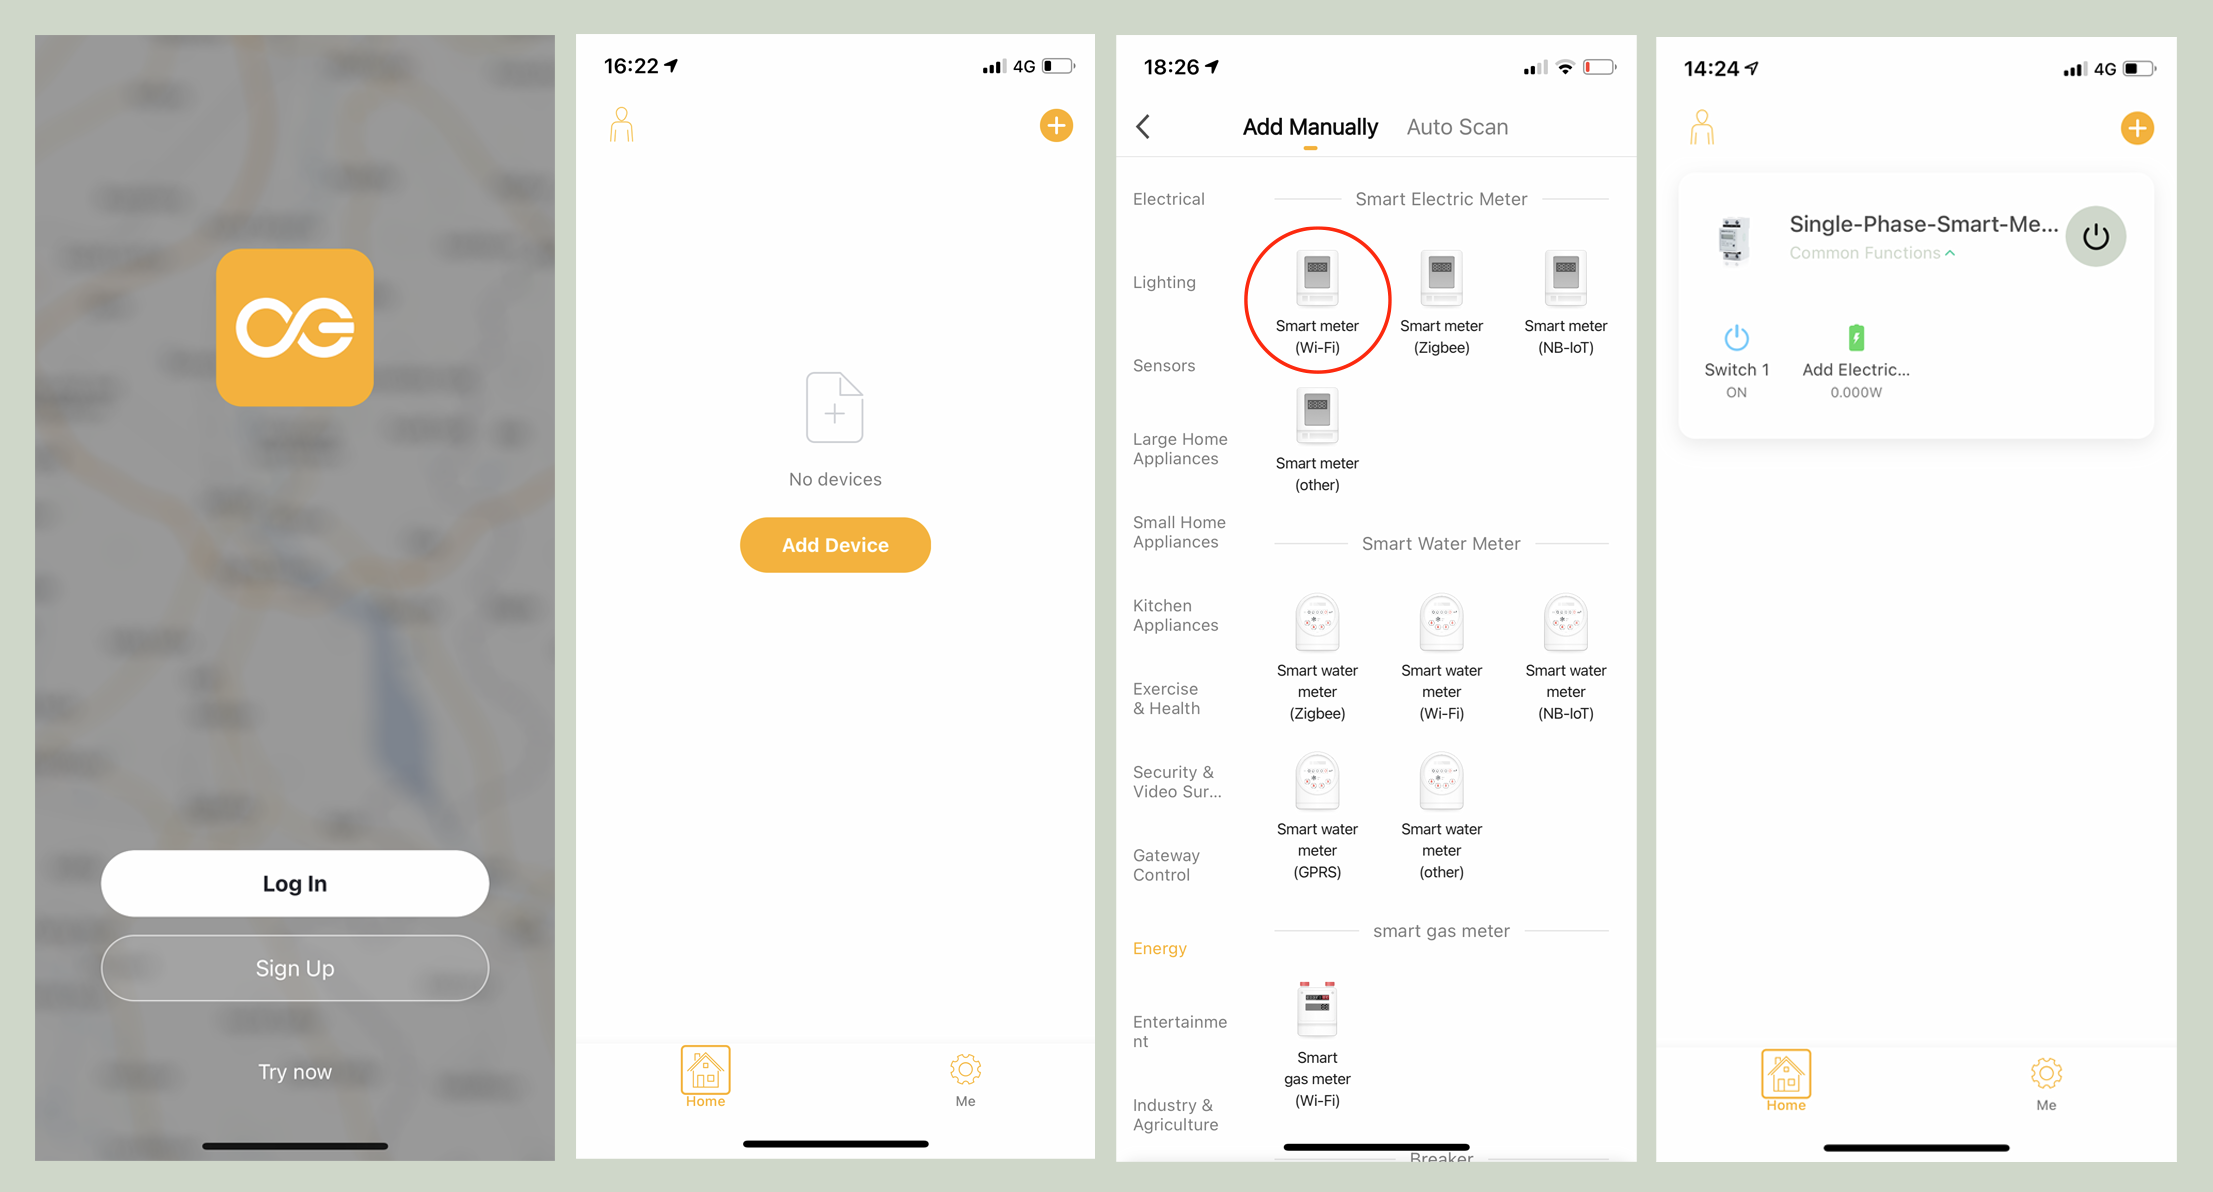
- Tap the icon (+) on the top right to add a device. Then select the “Energy” category and “Smart-Meter (WIFI)” from the list.
- Select the 2.4G WIFI as your mobile device’s connection. Input the correct password for your WIFI router network. Then tap Next.
- Here, the system will auto-connect with your smart-energy device. The process takes approx. 1-minute to complete. Once connected, you will be prompted to rename the device. Enter a new name for your charging point and hit “Save.”
Note: If you fail to add your charging station during the connection process, the app will prompt you with FAQ and troubleshooting options. Please read carefully and retry accordingly.
Register Your Smart-Socket Service on Crowd Energy Network

- Launch the Crowd Energy mobile-app.
- Choose “Sign-Up” to register for a new account or “Sign-In” to access your existing account.
- Tap on the device name which you have registered in the previous step.
- Tap the icon
 on the top right to access device details screen.
 - Tap on the “Device Information” item where you can find the “Virtual ID” of your device. Copy the ID string and enter your device into the Crowd Energy mobile app.
- Access the platform using the following link: app.crowdenergy.io BETA install the mobile app to easily access Crowd Energy from your device’s home screen.
- Tap on “Settings” > “My Services” > “Add Service” to access the screen to register your new Smart-Socket service on the Crowd Energy network.
- Enter the preferred name for your new service, and walk to the physical location of the new outdoor outlet. Tap the “Set Location” icon to load the GPS coordinates of your new service for the map, and then select the “Service Type” and pricing.
- Tap on “Advanced Settings” and paste the “Virtual ID” of the smart meter which you have copied in the previous step.
 Install Crowd Energy service placard.
- Access our “Resources” page to download the placard template for the service you intend to offer (i.e. Smart-Socket, Parking, etc).
- Find your preferred card size and download the template with unique QR code.
- Use your online and local resources to find a printing service that can print the template onto a hard plastic card for outdoor use.
Note: We recommend using recycled plastic material if possible. - Have your placard delivered directly to your door or pick it up from a local printer.
- Finally, install the placard on or next to your physical device for easy public access.
Choose and Mark the Outlet Location
- It is very important to choose the right location for your new outlet. Most critically, it must be easily accessible for Crowd Consumers on or outside your property.
- Of course, you will also want to optimize the distance between the outlet and electrical panel to as minimal as possible. A shorter connection cable between the power source and outlet will help lower construction costs, losses in efficiency, and potential safety hazards.
Turn Off the Power
- Turn off the circuit breaker of the power source which will control the outlet.
- Use a non-contact voltage tester to be sure that the power is off.
- Unscrew and pull the receptacle out of the electrical box.
- Hold the voltage tester over the terminals to double-check that the power is off.
Drill Through the Exterior Wall
- Use a wire sensor to determine that there are no hidden wires that you may accidentally cut before drilling into your exterior wall.
- Follow the instructions to mount the outdoor outlet at your selected location.
- Place the new outlet on the wall to mark the points where the holes will be drilled.
- First, drill a small hole through the wall or the building siding where the markers have been made.
- Then, drill a bigger hole over the smaller hole to make room for the cable.
- Most developed countries define a required minimum height above the ground to place a new power socket. Make sure you comply with these standards as applicable.
Note: If drilling through stucco, you’ll probably wreck the bit, but you’ll get through the siding. For brick, use a masonry drill bit with a hammer drill. Then drill a series of small-diameter holes around the marker hole and knock out the center with a hammer and chisel.
Run Cable From Power Sources
into New Outlet
- Find the distribution box in your house with free slot for new power-meter and circuit breaker device. The typical requirement for our certified power-meter is 35mm DIN rail. The distribution box needs to be in range of your WIFI router so the power-meter device can access the internet.
- Choose the right cable certified for maximum current and distance length between distribution box and outdoor outlet.
- Make sure you have a properly measured the length of the cable before buying it. Don’t join 2 short cables unless there is a technical reason which comply with standards.
- Run the cable from distribution box to new outlet location. You may need to cable out through the walls or ground to overcome the distance. Make sure cable is well covered and installed. Never make cable disclosed from outside instead run wire inside metal or plastic conduit.
Note: If you have aluminum wiring, call in a licensed electrician who is certified to work with it. This wiring is dull gray, not the dull orange that is characteristic of copper wire.
Mount and Wire the New Outlet
- If the cable is connected from outside, attach a clamp to the box, feed the cable through it into the box, and then caulk around the clamp.
- The caulk makes the hole watertight. We placed our box horizontally on the lap siding so it could lie flat.
- Mount the exterior outlet box to the wall.
- If you have lap siding (wood, hardboard, fiber cement) or plywood sheathing, mount the junction box to the wall, using exterior-grade fasteners. Simply drive galvanized deck screws through the mounting lugs. For brick or stucco siding, mount the box with masonry anchors. For vinyl siding over composition board, use hollow wall anchors.
- Fasten plugs into the openings on both ends of the box.
- Next, strip the insulation off the wire ends.
- Attach the ground wire to the green screw in the box and to the green screw on the outlet. Make sure to identify the “line” (L) and “neutral” (N) terminals. They may be labeled as “hot” (L) and “white” (N) terminals depending on the country’s region. Then, attach the brown or black wire to the brass screw or adjacent push-in hole (labeled “line” or ”hot”) and the blue or white wire to the silver screw or push-in hole (labeled “neural” or “white”).
- Finally, clip the ears off the outlet, fold the wires into the box, and set the outlet in place.
Note: Each outlet may be slightly different in details so the best way to complete this step is to follow the instruction manual you receive for the outlet.
Plug and Wire the New Circuit-Breaker and Smart Meter Device
- Ensure once again that power has remained off since step 2.
- In the power distribution box located in step 3, install the circuit-breaker (recommended capacity of 16A or higher) and the Crowd Energy certified smart-meter device, by plugging both into the DIN rail.
- Connect the wires so that the power coming from your house is going through the circuit-breaker first and then to the input (IN) of the smart meter. The output (OUT) of the smart meter should be connected with a cable ( installed in step 3). To wire a new outdoor outlet:
- Connect the phase “line” (or “hot”) wire ]to one of the screws in the circuit-breaker (typically the top or left one).
- Connect the second screw of the circuit-breaker to the input (IN) screw labeled as “L” on the smart meter. Here, use the wire of the same color as in Phase 1.
- Next, connect the input (IN) screw labeled as “N” to the smart meter with the “neutral” (or “white”) wire in the distribution box.
- Then, connect the brown/black color wire to the outdoor outlet with the output (OUT) screw labeled as “L” on the smart meter. Similarly, connect the Neutral wire of the same cable (wire in blue/white color) with the output (OUT) screw labeled as “N” on the smart meter.
Test the New Outlet
- Switch the newly installed circuit-breaker ON in the distribution box.
- Turn the power back ON in the same way as it was turned off in step 2.
- Plug in a mobile phone charger and connect your device to test the new outlet.
- If the phone begins to charge, then you are ready to proceed with the next steps to register your smart-meter device on the Crowd Energy Network.
Register A New Smart-Meter device on the Crowd Energy Network
- First, verify that your smart-meter device is powered up, by checking the LED indicator on the front side. If it is on, the light will be illuminated.
- Next, make sure the smart-meter device is located within the range of your WIFI router, so it can reliably access the internet.
- Install the Crowd Energy mobile-app from Apple Store or Google Play store.
- If the LED light does not blink, press and hold the pairing button located on the front of the smart-meter device for 5-second until the LED indicator blinks fast (2 times per second).
- Launch the Crowd Energy mobile-app.
- Follow the Sign-Up to register for a new account or Sign-In with your existing account.
- Tap the icon (+) on the top right to add a device. Then select the “Energy” category and “Smart-Meter (WIFI)” from the list.
- Select the 2.4G WIFI as your mobile device’s connection. Input the correct password for your WIFI router network. Then tap Next.
- Here, the system will auto-connect with your smart-energy device. The process takes approx. 1-minute to complete. Once connected, you will be prompted to rename the device. Enter a new name for your charging point and hit “Save.”
Note: If you fail to add your charging station during the connection process, the app will prompt you with FAQ and troubleshooting options. Please read carefully and retry accordingly.
Register Your Smart-Socket Service on Crowd Energy Network
- Launch the Crowd Energy mobile-app.
- Choose “Sign-Up” to register for a new account or “Sign-In” to access your existing account.
- Tap on the device name which you have registered in the previous step.
- Tap the icon on the top right to access device details screen.
- Tap on the “Device Information” item where you can find the “Virtual ID” of your device. Copy the ID string and enter your device into the Crowd Energy mobile app.
- Access the platform using the following link: app.crowdenergy.io BETA install the mobile app to easily access Crowd Energy from your device’s home screen.
- Tap on “Settings” > “My Services” > “Add Service” to access the screen to register your new Smart-Socket service on the Crowd Energy network.
- Enter the preferred name for your new service, and walk to the physical location of the new outdoor outlet. Tap the “Set Location” icon to load the GPS coordinates of your new service for the map, and then select the “Service Type” and pricing.
- Tap on “Advanced Settings” and paste the “Virtual ID” of the smart meter which you have copied in the previous step.
Install Crowd Energy service placard.
- Access our “Resources” page to download the placard template for the service you intend to offer (i.e. Smart-Socket, Parking, etc).
- Find your preferred card size and download the template with unique QR code.
- Use your online and local resources to find a printing service that can print the template onto a hard plastic card for outdoor use.
Note: We recommend using recycled plastic material if possible. - Have your placard delivered directly to your door or pick it up from a local printer.
- Finally, install the placard on or next to your physical device for easy public access.

